 ...well, probably - but exciting none the less. It looks like a bunch of the Northern California group will be trying to head cross country to Orlando, next year for Celebration VI! www.starwarscelebration.com While I'm not too thrilled at the idea of Orlando in August, I believe the experience is going to be amazing, especially having a droid there. It will be nice to experience the event rather than just read about it. So, look for a donation button soon to cover our fuel costs. ;) ...just kidding.
Thursday, June 16, 2011
Too Soon?
...well, probably - but exciting none the less. It looks like a bunch of the Northern California group will be trying to head cross country to Orlando, next year for Celebration VI! www.starwarscelebration.com While I'm not too thrilled at the idea of Orlando in August, I believe the experience is going to be amazing, especially having a droid there. It will be nice to experience the event rather than just read about it. So, look for a donation button soon to cover our fuel costs. ;) ...just kidding. Wednesday, June 15, 2011
Long Overdue...
So, I've pretty much figured that I could never have a career as a "blogger" - I'm just horrible at keeping up to date with this thing. Honestly, I doubt that there is anything you could really learn from me as I don't think I'll be doing really anything that is not of the "norm" or things I've already learned from other blogs. That being said, it's good to be able to look back at yourself and remind yourself of the journey...this will be my goal.
So, what has "capodimusica" been up to? Well, having moved from the styrene/wood/resin build to an almost full aluminum build...I've been a total droid pack rat. I've been aggressively searching for all of those parts that will make up my build. With many of R2's parts not currently being made, many things have been acquired by pure luck or honestly getting to something first when posted.
So, a GIANT accomplishment for my build is that I now have all of my needed parts minus 1 - a set of aluminum power couplers. My hope is I'll see a run of these shortly. Pretty much all of these parts are ready to go minus a few things that are currently being produced (JAG feet and holoprojectors.)
 So, today I had several packages arrive all at once. First being a smaller package with many aluminum parts I've been hunting for - the crown jewel of the day is my new David Shaw Radar Eye...that's right...you can drool now, I did.
 These were my new arrivals for the day, minus everything ON the legs, I just had to see how they look. I received the new JAG legs and they are just AMAZING, Jerry's part runs are always awesome. I grabbed my modular booster covers and had to see them on the legs, along with the horseshoes...looking very nice.
 So, this is where R2 is at...basically a pile of parts. While life has kept me insanely busy lately, I have been spending most of my time working on the Arduino logics. They have been great fun to play with but sadly most of that work will be enjoyed by someone else as I'll be selling two of the complete sets. The last set is a custom color for my R3-T2 styrene dome I'm working on. The 300mm R2 dome will get the coveted J.E.D.I. displays.
 My schedule will be opening up soon enough and droid building will begin at full speed. It looks like a group of us from Northern California will be attending Celebration in Orlando next year and I'll have R2 with me...fingers crossed. My goal as of right now is to finish him up by the holidays of this year. I'd also really like to take him to the theater when Episode I comes out in 3D.
So, for those actually reading this, thanks! I've said it before, do not doubt yourself - if I can build a droid...YOU can build a droid. I've seen budget builds, wood, styrene, all of these materials, when done right will look like...R2 you don't have to be crazy like I've found myself with the aluminum disease!
I'll try to stay current here from now on and try to remember to snap a picture from time to time when I'm in the middle of something.
Wednesday, October 6, 2010
I've Been Shopping...and building.
Okay, so I'm just horrible at keeping things updated on here but I will try and get things up-to-date. First off, I'm not sure if wiring up the slip ring should have been my introduction to soldering but I think I got the hang of it. Hearing Chris James in the back of my head saying "check as you go" helped things, along with the helping hands holder. each connection was checked, and cleaned up with heat shrink tubing. I ordered the slip ring through Ebay and got it fairly quickly. I also ordered the slip ring connection board from Scott and put that together at the same time.

With the wood frame there is not horizontal brace to mount the slip ring. I could have mounted it upside down on the dome ring but decided to add an aluminum brace at the top to be able to mount the slip ring.

Here I took the cover off of the d-sub connector so you can see the wiring from the slip ring. Not only did I use the heat shrink tubing, but I also bought a set of bright blue wire covers in different sizes that will be used in a variety of places to keep things cleaned up and add to R2's blue theme on the inside.
Next up on my list is the inner detail panel. This was not screen used but later seen published as the inside detail behind the door that receives the restraining bolt on R2. I just really liked the look of this panel and apparently I'm not the only one. A new addition to the the list of cool laser cut parts from A&A came out with this piece. So, I thought it would be a fun project to break up the larger parts of the build that can get overwhelming.
 Here is the published photo that the A&A part was based on
 and here is my version. It's not done yet and it's not exact..but hey, it doesn't have to be.
 I have on order some flat top blue LED's that will go in the bottom left. I replaced what looks like red push buttons on the published version for red LED's, I think it just looked better with some catchy red lights. The top right LED's are just temporary. I'm going to tone down the white lights, I also have a blinking red LED in the 4th "window'. I hope to come back later and have some more automated movement with the LED's flashing. The top right little holes next to each "window" is also going to get a fiber optic to close it and still let the light shine nicely.
With the wood frame there is not horizontal brace to mount the slip ring. I could have mounted it upside down on the dome ring but decided to add an aluminum brace at the top to be able to mount the slip ring.
Here I took the cover off of the d-sub connector so you can see the wiring from the slip ring. Not only did I use the heat shrink tubing, but I also bought a set of bright blue wire covers in different sizes that will be used in a variety of places to keep things cleaned up and add to R2's blue theme on the inside.
Next up on my list is the inner detail panel. This was not screen used but later seen published as the inside detail behind the door that receives the restraining bolt on R2. I just really liked the look of this panel and apparently I'm not the only one. A new addition to the the list of cool laser cut parts from A&A came out with this piece. So, I thought it would be a fun project to break up the larger parts of the build that can get overwhelming.
Here is the published photo that the A&A part was based on and here is my version. It's not done yet and it's not exact..but hey, it doesn't have to be. I have on order some flat top blue LED's that will go in the bottom left. I replaced what looks like red push buttons on the published version for red LED's, I think it just looked better with some catchy red lights. The top right LED's are just temporary. I'm going to tone down the white lights, I also have a blinking red LED in the 4th "window'. I hope to come back later and have some more automated movement with the LED's flashing. The top right little holes next to each "window" is also going to get a fiber optic to close it and still let the light shine nicely.
I'm also going to have to modify the frame a bit to get it to fit my wood frame. For the most part, I'm pretty happy with it and it will just add to the magic when that door panel opens up and reveals this. The whole thing will be on a switch with the door so as not to run all the time. This was a fun little project and not overwhelming at all, I'd recommend trying this out if your first starting out as you'll get some time working with styrene, painting techniques, weathering techniques, soldering/electrical, and then in the end...a pretty cool little detail that will not take you long to complete.
More purchases included getting in on the run for the aluminum battery boxes, aluminum center vents, I purchased my amplifier, speakers, Futaba radio/receiver, battery charger, AND my JEDI controller came in. I'm still waiting on the JEDI display and JAG foot drives that should be in soon. And I'm totally excited to get the 300mm dome towards the end of the year.
More purchases included getting in on the run for the aluminum battery boxes, aluminum center vents, I purchased my amplifier, speakers, Futaba radio/receiver, battery charger, AND my JEDI controller came in. I'm still waiting on the JEDI display and JAG foot drives that should be in soon. And I'm totally excited to get the 300mm dome towards the end of the year.
Unfortunately, with the holidays quickly approaching, along with the entire family celebrating our birthdays in the next two months and vacations, R2 is not going to see much more in purchases until after the holidays. There will althought be plenty to do with what I have. With the radio/receiver, JEDI controller and sound system, I hope to get started on that soon.
I am also looking forward to driving down to R2LA this next week with Chris James, it will great to visit with other R2 builders. Plus, a trip with no commitments, work, or obligations will be nice change.
Wednesday, September 15, 2010
Dome Progress and More Parts...
Well, after quite a bit of work I'm getting closer to finishing the dome. This dome I guess you could call my "starter dome" as I'm excited to be getting a new 300mm dome soon enough. The styrene dome was a great way to get my feet wet and I haven't decided weather to see if another builder could use this one and get a new styrene or repaint this but my plans are to paint this to match a background droid from ANH, a red and white dome. This will allow me to be a little more flexible if needed. Again, this was a great learning opportunity.
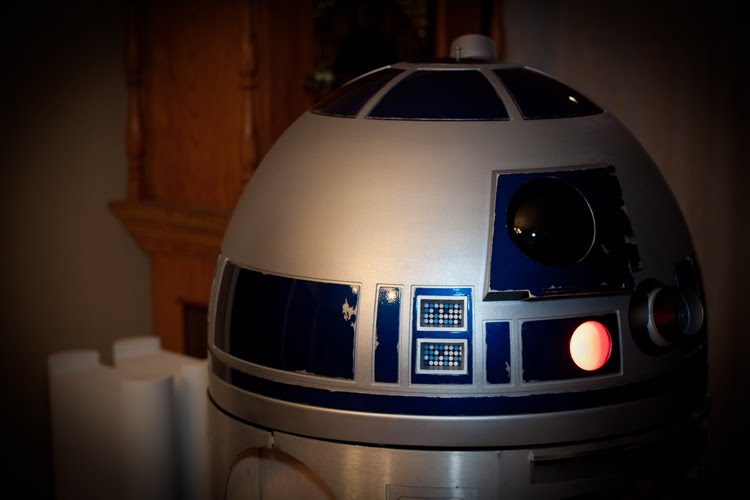
 This is the styrene dome, with front and rear PSI's from Mike Velcheck and the radar eye, lens, and logic surrounds are from Azman. I'm waiting on the JEDI display for the logics. There is also a micro controller (roboduino) that is moving the front HP.
 I love the look of R2 in ANH, I love the beat up dirty look that really projects a great story behind each scratch. I'm details the panels and will be using a few techniques for the dome, I'm pretty happy with the styrene dome and think after weathering it a bit more, things will blend much better.
 Here's my solution on how to attach JAG's new skirt to my wood frame. I'm sure there are much better ways to do this, but this is how my brain came up with it, it attaches perfectly and looks good, strong, and stable.
 I'm waiting on the foot drives to come in, JEDI controller, motors, and I'm working on soldering the slip ring connection boards to the slip ring to bring power up to the dome. I'm also working on a few details that will be hiding behind a few panels, once I'm happy with the fit, I'll glue up the frame and then get starting really putting things together. Once the frame is glued, I'll start cutting out panels and painting the skins before things get cold and wet around here.
It looks like I'll be going to R2LA and look forward to visiting with some other builders.
Sunday, June 20, 2010
Photo updates....
Just a few updates and comments...
 I started getting my PVC battery boxes ready with a few coats of primer. These were made by Matt McCormick and he did such a great job. I realized later that these are a little short so I might not be able to get my NPC motors to fit but I'll prep and get them ready anyway. I might go with aluminum at some point and someone else can use these...not sure yet but the craftsmanship is very nice! - you can find more information on these at his blog at: http://www.buildr2d2.blogspot.com/
 I drilled out the PSI diffuser set from Daren to make room for my PSI's from Mike Valcheck - these things are just awesome and super bright!
 I haven't done a whole lot here, the frame, skins, and dome. This was before a LOT of sanding to get the inner and outer dome to fit. I'm hoping to paint the dome this next week if I can manage to cut everything out - pretty easy on the styrene dome. I was working on the inner skins so they are missing in the photo.
 I quickly put together Andy's HP Servo Holder...I think it's a great item to have and will need to fine tune it when I get to that point.
 I had a LOT of frustration in trying to get things to line up and fit. My problem was that things just were not fitting right. The CNC cut wood frame was a little short, something that is normal so you don't "see" the frame above the skins. Well, mine was a little more than 1/8" short so my great LDP from David Shaw just would not fit, even after cutting the top of the frame. I managed to get clearance for the LDP but then after propping it up, the Rocker bearing would sit level. So, I used a cut piece of PVC to add to the top of the frame. So, in the photo, after some time, I have the LDP fitting perfect with the skins and frame...a beautiful site. I'm waiting on a few more items to check the fit before I glue and attach the skins so things are still in a holding pattern but at least I can see it working. I have not decided yet if I will just paint the frame (behind the LDP) black, or if I will get out the router, I'm thinking probably some flat black will be in my future.
 So, there are a few other things I working on, a few more items have come in from my friendly UPS/USPS/and FedEx guys.
I'm still waiting on a few parts for the dome and I cannot wait to get it painted and looking just right. I'm also getting an aluminum dome but will use the styrene for awhile. As I started with the styrene, I'm going to finish R2 with it and will upgrade later when I have the time. Questions are always good and if you're seeing me making a grave mistake on something...please, mention it! ;)
Friday, June 4, 2010
What a Rebel...
So, I sanded some more and I'm almost there to primer the dome...then sand some more. I really REALLY wanted to get the styrene dome together without having to cut the dome...I'm sure it really doesn't matter and I get that it would have saved me a bunch of time, but I just wanted the inside to be clean and solid.
One thing I really like is that each of these droids is so unique...even all the R2's. You could have asked me a year ago in a lineup and I wouldn't be able to tell the difference but now having spent some time with them, you quickly learn how to pick out each other's droids in a lineup.
While I'm making R2-D2, I'm not really going to follow a specific scene, I'm taking a few different things that I like and making it work. While a pure aluminum HP really is a beautiful thing, I really like the painted segments of the hp's seen in ANH. I also like how one of the back panels is not painted and one of the back panel on the dome is not painted either. I'm going to go with the "LA" look and leave the inner skin unpainted too. While I think the same detail can be achieved with weathering...I'll be doing both. Also, while I'm sure some will roll their eyes, my dome bumps will be LED switches as some have used, mine were ordered this morning and I'm including a photo of what they look like. No, it's not screen accurate...but I like the added detail. I don't think I'll have the switch actually connected anything though as kids hands tend to wander...but I like the LED look. Mine is the blue LED but the outer rim is aluminum to match the dome and not black.
 Also, another update was I've ordered the 300mm aluminum dome. I think it will be awhile before I do anything with it but once my build slows down a bit, I'll at least have it on hand to work with.
One thing I really like is that each of these droids is so unique...even all the R2's. You could have asked me a year ago in a lineup and I wouldn't be able to tell the difference but now having spent some time with them, you quickly learn how to pick out each other's droids in a lineup.
While I'm making R2-D2, I'm not really going to follow a specific scene, I'm taking a few different things that I like and making it work. While a pure aluminum HP really is a beautiful thing, I really like the painted segments of the hp's seen in ANH. I also like how one of the back panels is not painted and one of the back panel on the dome is not painted either. I'm going to go with the "LA" look and leave the inner skin unpainted too. While I think the same detail can be achieved with weathering...I'll be doing both. Also, while I'm sure some will roll their eyes, my dome bumps will be LED switches as some have used, mine were ordered this morning and I'm including a photo of what they look like. No, it's not screen accurate...but I like the added detail. I don't think I'll have the switch actually connected anything though as kids hands tend to wander...but I like the LED look. Mine is the blue LED but the outer rim is aluminum to match the dome and not black.
Also, another update was I've ordered the 300mm aluminum dome. I think it will be awhile before I do anything with it but once my build slows down a bit, I'll at least have it on hand to work with.
Wednesday, June 2, 2010
More Parts on the Way!
Well, work has left me just way too busy but I of course have had some time to spend some money! I ordered a few aluminum parts from David Shaw that should be here in another week, of those, the coin slot is going to help me align the skins. I also ordered some VHB tape to help with the skins and some special aluminum paint that will go on the dome once I'm done filling/sanding/filling/and sanding.
I ordered the atomic pickle Pittman dome drive and the Pittman motor arrived yesterday. I got in on the aluminum skirt run along with a few other parts and can't wait to start working on things.
While I do not have much to show for my efforts or photos, I thought I'd leave you with a story from this week. So, here you go...
I was one of the parent helpers in a walking field trip with my daughter's elementary school class to one of our local fire stations. These kids were so excited to meet some REAL heroes and I also enjoy going along to help out. During part of the Fire Captain's "show and tell" he had the parents line up by different compartments on the large ladder truck. Once the Captain pointed to us, we would open the door and everyone would first guess what the item was used for and explain its' purpose. So, I had my assigned door and once it was my turn, before I opened the door, the captain told the kids, "Now, our next door we have....R2-D2!!!" uhhhh, what!? Really!? Haha, Now, I have not told anyone what I'm working on at home so it was a VERY strange experience, OF COURSE, it would be ME that got that door! Well, it turned out that behind the door was the turbo vac that they use to suck up flooded water from homes...and yes, it did in a strange why resemble R2. I kept my mouth shut about my little project but perhaps someday in the future, I'll introduce them to the REAL R2!
I hope everyone is doing well and progressing on whatever stage of the build you're on.
Subscribe to:
Posts (Atom)